Reminder

Please install and use SMOVE PRO in accordance with this User Manual

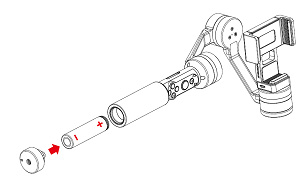
  1. Serious Warning: If you remove the SMOVE PRO battery, please make sure to install the battery back as follows (Note the positive and negative direction of the battery):#
  2. Charging Prior to Use. Please charge your unit fully prior to using SMOVE PRO because it is shipped out from the manufacturer at half the battery capacity. Refer to Section 2.8 for charging instructions.
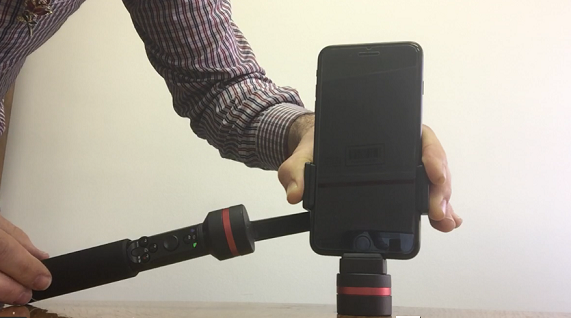
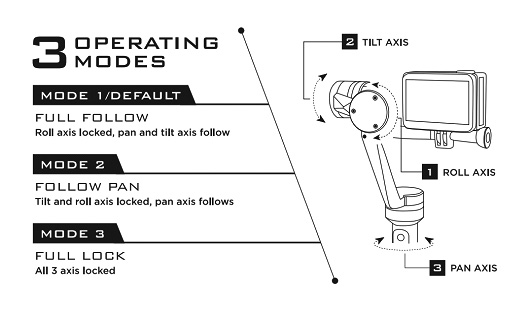
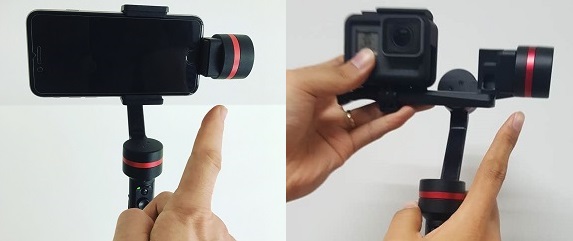
  3. Inserting Your Smartphone/Camera Prior to Powering On. Insert your smartphone/camera prior to powering on the SMOVE PRO (make sure to adjust your smart phone at a horizontal level along and to the LEFT of the Tilt axis prior to Powering On; a counterweight is provided as needed): #
  4. Best Practices. Tips and Tricks Video To achieve best results with SMOVE PRO and your smartphone/sports action camera, keep your movements as gentle and smooth as possible while capturing video.
  5. Balancing. Balance your SMOVE PRO first prior to powering on.
  6. Warning: Do not power on SMOVE PRO naked without a smartphone/camera inside
  7. Warning: Never switch the smartphone/sports camera mode switch button while SMOVE PRO is on.
  8. Prohibited Uses. Do not use SMOVE PRO in any manner not indicated in this User Manual.
  9. Use of SMOVE PRO. You are solely responsible for all behavior of purchase and use of SMOVE, SMOVE PRO or any SMOVE products. SMOVE, nor any/all of its affiliates, are not liable nor responsible in any way for your use of SMOVE PRO stabilizer and SMOVE products.
  10. Responsible Behavior. Please use your SMOVE PRO responsibly and courteously at all times.
  11. SMOVE Operation. Please try to be a SMOVE operator at all times.
  12. Thank you. On behalf of everyone who has worked so hard to make this great product a reality, thank you for your unwavering support and patience. May you enjoy your SMOVE PRO and attain amazing results with it!

Accessories list:

  1. SMOVE PRO 1 set
  2. Sports action camera mount 1 set
  3. Counterweight 1 pc
  4. MicroUSB cable 1 pc
  1. Indicator LED 1
  2. Indicator LED 2
  3. Power switch button
  4. Control joystick
  5. Mode switching button
  6. Portrait mode/Panorama button
  7. Video/Photo button
  8. Tilt Axis
  9. Roll Axis
  10. Pan Axis
  11. Charging indicator LED
  12. Smartphone/sports camera release screw
  13. USB charging port
  14. 1/4 Screw Thread
  15. Smartphone/sports camera mode switch button

Bluetooth:

Name: SMOVEPROBT-x

Version: Bluetooth 4.0 low energy

Battery:

  • Type: Li-ion
  • Single cell: 18650
  • Voltage: 3.7V
  • Capacity: 3400mAh

Sports camera bracket:

Comprised of two parts: a bracket and a sports action frame clip

Counterweight:

If your smartphone is too heavy, please utilize the counterweight with your SMOVE PRO, using the assembly method as shown below:

Working Mode and LED Indicators:

Indicator LED 1 (Left LED) Mode/Function
Fast flashing red light (4HZ) Low voltage/power, turn off after 5s
Green light ON Full follow mode (default mode)
Blue light ON Follow pan mode
Red light ON Full lock mode
Slow flashing blue light Calibration processing
Fast flashing blue light Calibration completed
Indicator LED 2 (Right LED) Model/Function
Green light ON Ready to power on/power off
Green light flashes quickly Power on/Power off
Green light flashing 1x once powered on Low voltage/power
Green light flashing 2x once powered on The power is very good
Green light flashes 3x once powered on The power is sufficient
Blue light ON for 5s Bluetooth connected
Blue light flashes slowly for 5s Bluetooth disconnected
Red light solid Phone not balanced

2.SMOVE PRO user guide

The SMOVE PRO controls allow to switch to different modes, snap photos and record videos, switch to portrait mode, and switch between the smartphone and camera modes.

  1. Powering On/Off
    Press the Power button two times to Power On/Power Off: First press it once, then the second time long press it for 3S in order to Power On/Power Off the SMOVE PRO.

  2. Control joystick
    Press the Control joystick to Left or Right to control the SMOVE PRO Pan axis to move Left or Right (disabled in the Full Follow Mode). Press the Control joystick Up or Down to control the SMOVE PRO Tilt axis Up or Down (only available in the Full Lock mode). Note: Control directions can be modified in SMOVE PRO APP.

  3. Video / Photo button
    When SMOVE PRO and its APP are successfully connected via Bluetooth on your smartphone, you can use this button to control taking photos and videos. Single press the button to take a photo/video (depending on whether you are in the Photo/Video mode in the app), and double press it to switch between the front and rear camera.

  4. Portrait Switch Mode / Panorama button
    To switch your smartphone from horizontal to portrait mode, single press this button for the SMOVE PRO to automatically rotate to the portrait mode. To achieve 360 degree rotation for panorama shots, make sure your smartphone is first in the landscape position and in the Full Lock mode (Red LED) mode, then double click this button.

  5. Mode switching button
    Single press the mode switching button to change between the three operational modes: Full Follow (default green LED) / Follow Pan (blue LED) / Full Lock (Red LED). Double click the mode switch button to return back to the default Full Follow mode. Long press and hold down the mode switch button to temporarily activate the Full Lock mode.

  6. Smartphone/sports camera mode switch button
    Important: DO NOT SWITCH THIS BUTTON WHILE THE SMOVE PRO IS POWERED ON.
    While your SMOVE PRO is Powered Off, and after you have correctly removed the smartphone bracket and replaced it with the sports camera bracket, make sure to press this switch on your SMOVE PRO to the "down" (camera) position prior to Powering On. This button is to be used ONLY prior to Powering On your SMOVE PRO. Make sure this switch is in the "up" (smartphone) position prior to Powering On if using your SMOVE PRO with your smartphone bracket with your smartphone correctly installed prior to use.

  7. Switching between the smartphone and sports camera brackets
    SMOVE PRO is assembled with the smartphone bracket by default. To switch SMOVE PRO for use with your action camera, carefully use a coin/screwdriver to first loosen the smartphone bracket and then insert the sports camera bracket and tighten. Reverse the procedure to insert back the smartphone bracket.

  8. Charging the SMOVE PRO
    Whether Powered on/off, the SMOVE PRO can be charged with a laptop or a power bank, mobile phone charger, car charger , etc.
    Charger specifications are as follows: [Voltage: 5V, Current: 2.1A, Micro USB]
    Red light: charging                            Blue light: charging completed

  9. 1/4" Screw Thread
    The 1/4 Screw Thread is under the handle to allow your SMOVE PRO to be extended and/or used with a tripod.

  10. Low voltage/power warning.
    When the SMOVE PRO voltage is below 3.5V (low power), the top right LED will turn red to indicate the voltage is too low and to charge the device.

3. The SMOVE PRO APP

Warning: The instructions below are based on the iOS app. The icon locations in iOS/Android may be different, but the function is the same.

Download and install the "SMOVE PRO" app. Once installed, you will see the app icon:

  1. Enable Bluetooth on your smartphone and open the SMOVE PRO app, home screen below:
  2. Click "Connect Device", choose SMOVEPROBT-X, and the app will open the image capture interface with ten icons on screen.
    1. Flash On/Off
    2. Settings
      SMOVE PRO's image capture ("Follow-up") speed, 4 directional gimbal control directions, and video recording quality can be changed in the settings.
    3. Motion capture (object tracking) control
    4. Back to home screen
    5. Enter photo/video album
    6. Switch for Bluetooth connection
    7. Button for photo and video
    8. Front/back camera switch
    9. Photo / video recording mode switch
    10. Photo options
  3. From the app main screen, you can select the Editor to edit/share your photos and videos.
  4. Firmware Update
    Firmware updates are downloadable directly to your SMOVE PRO via bluetooth. The SMOVE PRO app will remind the user whether there a new firmware to download (please allocated approximately 8-10 minutes for the firmware updating procedure).

4. Calibrating your SMOVE PRO

Because the gyroscope can be affected under certain conditions, and if the SMOVE PRO has been used for a long time, the roll axis may stop being level and/or the tilt axis may be affected. Please follow these easy steps to re-calibrate your SMOVE PRO.

  1. With your smartphone inserted correctly, power on the SMOVE PRO.
  2. Long press the Portrait mode button (SMOVE PRO will turn off).
  3. Place your SMOVE PRO (keeping your phone inside) on a flat surface as shown in the diagram below, holding it still, and click once the Portrait mode button.
  4. Once the left blue indicator LED start to flash quickly, the calibration is finished.
  5. Turn off your SMOVE PRO.
  6. It is recommended to also re-charge SMOVE PRO prior to use.

5. Specifications

Product Name SMOVE PRO
Dimension 296 x 107 x 105 mm
Weight 470g
Angular Jitter ±0.05°
Pitch Angle 310°
Roll Angle 310°
Heading Angle 360°
Follow-up Speed 10-120°/S
Compatibility Mobile phones under 6.1 inches
Maximum Current 1.5A (Single Shaft)

6. The SMOVE PRO 3 Axis Technology System

To help better illustrate the SMOVE PRO 3-axis system, please refer to the below diagram showing the 3 operating modes with a perspective diagram from the back of SMOVE PRO using a sports action camera as an example.

7. Attention

Please install and use in accordance to the User Manual!

  1. Please charge the battery with the provided battery charger.
  2. Please install the smartphone securely before powering on the SMOVE PROstabilizer.
  3. Please keep the SMOVE PRO stabilizer away from fire.
  4. You are solely responsible for all behaviors of purchase and use of the SMOVE products. SMOVE, nor any of its affiliates, are not liable nor responsible in any way for your use of SMOVE PRO stabilizer and SMOVE products.
  5. Prohibit any use for any illegal purchase. For any unknown and/or illegal sources of purchasing or using, we will not provide any service.
  6. SMOVE nor any of its affiliates assume zero liability for any risks related to or resulting from the debug and use of this product (including the direct, indirect or third-party losses).
  7. SMOVE reserves the right to amend this manual and the terms and conditions of use the SMOVE PRO stabilizer and SMOVE products at any time.

Warning

Changes or modifications to this unit not expressly approved by the party responsible for compliance could void the user’s authority to operate the equipment.

ROHS

This product is in compliance with Directive 2011/65/EU of the European Parliament and of the Council of 8 June 2011, on the restriction of the use of certain hazardous substances in electrical equipment.

NOTE: This equipment has been tested and found to comply with the limits for a Class B digital device, pursuant to Part 15 of the FCC Rules. These limits are designed to provide reasonable protection against harmful interference in a residential installation. This equipment generates, uses and can radiate radio frequency energy and, if not installed and used in accordance with the instructions, may cause harmful interference to radio communications. However, there is no guarantee that interference will not occur in a particular installation. If this equipment does cause harmful interference to radio or television reception, which can be determined by turning the equipment off and on, the user is encouraged to try to correct the interference by one or more of the following measures:

  1. Reorient or relocate the receiving antenna.
  2. Increase the separation between the equipment and receiver.
  3. Connect the equipment into an outlet on a circuit different from that to which the receiver is connected.
  4. Consult the dealer or an experienced radio/TV technician for help.

This device complies with Part 15 of the FCC Rules. Operation is subject to the following two conditions:

  1. This device may not cause harmful interference, and
  2. This device must accept any interference received, including interference that may cause undesired operation.